Sunday, December 2, 2012

Room Updates

Our room is always changing with new resources and exciting elements! 
Here are a few things we've added since the begging of the year. 


This is our "I can..." board! We change this board weekly to correspond with our our objectives. We put the objectives in student friendly terms so that they can make the connection between our learning goals and the lessons we do. Each morning during our hook ups, we review our 'I can' statements for the week. The students say "I CAN" and then the teacher reads the statement. This is a great resource to use when stating objectives during and after lessons!


These are just a few pictures of our room! We are in an open classroom environment so there aren't many walls but we do have plenty of floor space!


We also have a brand new rug thanks to donorschoose.org!

It is great because each student can sit in their own square and have enough room to themselves. We are working on incorporating games with the colors to make our lessons more interactive! I have also seen some teachers assign color spots to each student. Which ever color you are on is your team for that 9 weeks! Assigning spots helps with quick transitions and cooperative learning groups.

Predictable Chart

Each week, we complete a predicable chart to hang in our room! The sentence pertains to our unit study or out letter of the week. The sentences are short and, of course, predictable!

Right now, we are spending a lot of time on letter knowledge so we are exploring 1 letter each week. For these charts, the sentence always reads..

"(letter of the week) is for ________________ "
ex: "Bb is for brain. (Ms. White)

This predictable chart is from when we had our family unit study. Each student counted the number of people in their home and we wrote the number into their sentence. 
Ex: "I have three. (Ms. White)"

There are a few things we do to make the predictable chart a knowledge packed lesson:
  • Allow students to choose which color they would like have their sentence written in
    • during our color study, we have the children spell the color they want to use!
  • Ask higher order questions to increase sentence structure awareness 
    • "Why is the 1st letter capitalized?"
    • "What sound will your word start with?"
    • "Is there a place in the classroom that can help you spell your word?"
    • "What do we need at the end of every sentence?"
  • Show students how to stretch out the sounds in their word and help them spell it correctly
  • Add a period after the sentence is written
  • Add the student's name in parentheses at the end of their sentence to show ownership 
    • we have them read their name after reading their sentence ex: "by Ms. White" 
  • When their sentence is completely written, we ask students if they would like to read it by themselves or if they would like some help from the Nemos
    • if students ask for help, read the sentence together and then let them read it by themselves
    • once they read if by themselves, we give each student a 'picture cheer'!

Monday, August 20, 2012

Inquiries- Week 2

This week, the inquiries were all based on 1-5 numbers and the value they hold. It is so important for students to see that the number 5 actually represents a value of 5 individual items. I loved seeing students go from not seeing this correspondence to actually understanding the meaning of a number! For each of  the activities below, we would check for:

- the numbers being in the correct order 1,2,3,4,5
- the correct number of items corresponding with the number
- counting in order 1-5
- identify/recognize numbers out of order ("can you tell me what number this is?" & "where is the 2?")


1:1 to 1 Correspondence Counting Bear (1-5)


Students placed counting bears on the dots of number cards. We didn't stress that students used the same size bears or the same color. As long as the 4 card had 4 bears, we said it looked great! 


2: 1 to 1 Correspondence Beans Match (1-5)

Someone spilled the beans! Students put beans on mats. As you can see, some of the activities are a bit large and take up some space. We let them get on the floor and use the manipulatives so that they feel free to play with the sequencing. We also encourage them to organize numbers in order and in a straight line so that they can begin seeing how 5 is more than 2. 


3: 1 to 1 Correspondence Dot Paint (1-5)

We put dots of paint into circles to match the numbers. I thought about what would happen in we did not have the dots so students were thinking about the value rather than filling in the dots under the number. This could be a good activity to start with and talk about value with. You can show students that the 1 box has only 1 dot and the 3 box has only 3 dots. 


4: 1 to 1 Correspondence Family Match (1-5)

Only 1 person can live in the 1 house and only 2 people can live in the 2 house. Put the correct number of people into each home! This activity was a bit confusing for some students because they wanted the people who looked alike to all live in the same house. The students were not necessarily concerned about the numbers at first so we would let them play with the families and then encourage them to do the work.


donorschoose.org


This is a site where teachers can apply to receive resources from companies that want to give back! It is pretty simple to do and you can get some really great things- we just got 4  exercise balls for our students to bounce on while they sit! All you  have to do is take a few pictures of how the resources are being used and write a note to say thank you to the company who donated to your class.  

Friday, August 10, 2012

Wibbly Wobbly Woo

wibbly wobbly woo,
an elephant sat on you!
wibbly wobbly wee,
and elephant sat on me! 

wibbly wobbly weve, 
and elephant sat on....Eve! 

wibbly wobbly watie,
an elephant sat on....Katie! 

The students absolutely LOVED this activity! We were learning about rhymes and used this game to make up nonsense words with students' names. We went through and said the rhyme with every single student and teachers' name. It took a few tries to really get them into it but after about 5 names they were standing up and trying to figure out who's name we were rhyming with! This activity really points out the fact that rhymes are created by similar middle and ending sounds.

Monday, August 6, 2012

Inquiries- Week 1

We did a lot of work on our names during the 1st week of school so our inquiries were all name based. Unfortunately, I didn't think about taking pictures of the inquires until this week had passed so I don't have pictures of the activities.


1: Shaving Cream Name Writing
Students spread around shaving cream with their hands and then practice writing their name using their finger. They thought it was too messy at first and were reluctant about touching the shaving cream but once they try playing, they absolutely love it! Afterwards we just wiped off the shaving cream with a dry paper towel- it cleaned the desks at the same time! 

2: Cotton Ball Name Gluing
We wrote the students' names in pencil on a poster board paper cut into 4 inch tall pieces. We then traced the 1st letter in black marker. The students were instructed to glue cotton balls onto only the black letter. Most of them ended up gluing their whole name with cotton balls but that's okay because our goal was for them to explore their name & they did that either way! If the students only glued the first letter, we asked them to use a marker and trace the rest of the letters. 

3: Dot Paint Names
K ___ ____ ____ 
(Kate)
We had a piece of paper for each student with the first letter of their name printed in bubble letters and the rest of the paper were just blanks for students to fill in the remaining letters. The students used dot paint to fill in the first letter and then used markers to write the rest of their name. This was a bit confusing for some because many names started with the same letters so they ended up using other's names on accident. I would help the students find their names next time instead of letting them try to figure it out. 

4: Name Sequence Puzzle
Last week we read Chrysanthemum and made a name graph with our students to see whose name was the longest, shortest, or the same. For this inquiry, we used the name papers from the graph and cut them apart. We then put the names into baggies and wrote the students' names on the baggie. This was a pretty easy task for most students, however; some would get confused when their baggie was upside down and the name on their baggie was also upside down. They would then put their names upside down too and even backwards! 


Saturday, August 4, 2012

Center Time

We have 40 students so we need plenty of centers. Here they are! 

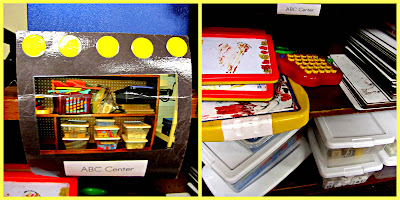
Before we get started, you should know how it all works. The yellow dots show how many people can be at the center. Each student has a clothes pin with their name on it and they clip the pin to the dot when they want to be at a center. Student can only go to 1 center per day. My mentor teacher says that some years he has let students change centers if they would like to but that 1 per day is working right now. 

Sand Tubs
This is probably our most popular center! We have another one called the rice tub and it is full of just rice and a few beans. The tubs can get a bit messy so we have a small broom and dust pan the students can use to clean up. We also tell them that if a center gets too messy and a teacher has to clean it up then we have to close it for a few days. 

Bucket Toys
These are played on the ground and can be mixed up to create lots of fun games! Our students needed just a little help getting started with this center because they didn't see what all could be done with the toys. Once we gave a few suggestions, like building a boat or a super store, they took right to it. 

Blocks
It's all in the name, just lots and lots of blocks! There are a few railroad kits in there too plus the barns with a handful of animals. These animal have lived in some of the most elaborate block barns I have ever seen. 

Tub Toys
In the tubs are interesting things for students to explore such as keys, tiles, strings of beads, buttons, and more!  

Games and Puzzles
This center has board games, matching games, and puzzles. I like to check in on students in this center because they sometimes don't know the rules to the games. Also, there are sometimes four students in this center but they are all playing different board games. I help them choose one and then play with them all for a few minutes until they are into it and understand how to take their turn. When deciding who takes the first turn, I like incorporating a little education by saying "the shortest person goes first" or "the youngest player goes first". This lets them learn a bit about each other and themselves while practicing basic math skills. 

ABC Center
There are big ABC foam blocks, ABC puzzles, white boards, phonics games, and magnetic alphabet letters. In my Reading Education class we learned that it is important to let students explore letters without an academic aspect. Taking this into consideration, I don't always go to this center and help students put the letters in order or help them practice writing. Instead, I'll ask what they are doing and just see if they would like any help with what they are working on. 

Home Living
Another very popular center! Students love getting out food, stuffed animals, old cameras, and old cell phones to play house with. This center needs a bit of room for the students to get everything out in. Also, this center can get very messy because a lot of people can play here and there are a lot of pieces to the center. We tell the students that if it takes too long to clean up then their mess might be too big. 

Doll House
That's it, just a sweet pink doll house! I was surprised that both boys and girls like to play with the families in the home. 

Reading Center
There are books, magazines, and student made books in the center. There are also whisper phones for students to practice using. The bench seat is filled with puppets and stuffed animals that the students can practice reading with or reading to. 

Free Art
This is a creative place for students to draw, cut, glue, and tape! We use scrap paper and some construction paper from our recycling bend. 

Cleaning Up

Our clean up procedure is the same every day so students know exactly what to do. First, a teacher blows a train whistle when there are 3 minutes left until clean up time. We ask the students to begin cleaning up if they have made a large mess. 3 minutes are put on the timer and the students keep playing. When the timer goes off, we announce that it is time to begin cleaning. We then play our clean up song and let the students clean. When the song is over, everything should be put up and all students should be on the carpet. We also like to remind students that it is nice to help others clean up but, if you just want to tell them how to clean, then it is time to come sit on the carpet. If it takes a center a while to clean up and they are late to the carpet, we help them clean and talk to them about making smaller messes. There are a few centers that students need help putting away such as the heavy rice and sand tubs. 


Inquiries

inquiry: an official investigation

 Inquiry time is when our student explore topics through hands on activities. The activities are academic based and usually address a skill the students have been working on. We do 4 inquiries each week, one a day Monday-Thursday. Each student does one inquiry per day and must complete all 4 by the end of the week. 

We set up the inquiry activities on the student's tables- there are 2 tables for each inquiry. We keep the activity supplies in a tub with a lid so that all we have to do is pick up the tub and place it on the table for the activity to be set up! This is also great because each week we just take out the old supplies and put in the new week's materials. It is also handy to have the lid and tub labeled with numbers so that  students can see exactly which activity they are at. 

The Club Card is what we use to keep track of what activities the students do each day. The tubs are set out on the tables and students are allowed to choose which one they go to. When they are finished, we ask them to stay seated and raise their hand until a teacher comes to check their work. We typically only check for completion and if the work is not correct, we just point out how to do it correctly. We then cross off a number with a marker to show that they have completed that activity. When we pass out the Club Cards, we like to remind the students which activities they have left so that they don't do the same activity twice. If they accidentally do an activity 2 times, we just ask them to move to one they haven't done and take the time to complete it. 

Some inquiry activities take less time than others so when students are done with their activity, they clean up, get their clothes pin, and choose a center to play in. 


                     Club Card

1


2

3

4

Alphabet In Action

During Alphabet in Action time, we explore the alphabet! We are using the program Wilson beginning in the next 9 weeks. We have not yet received the book so we are introducing letters and using zoo phonics for now. 


Introducing Letters
When introducing letters, we first show the students how to write it. We have names for each line and we use these names very intentionally each time we talk about the letters. The lines are shown below: sky line, plane 
line, ground line, and the worm line. To write the lower case k we say "start at the sky line, vertical line down to the ground line, frog jump over to the plan line, slant line in and kick out". We use the phrases 'vertical line', 'horizontal line', 'slant line', and 'curved line' to explain the shape of the letter's parts. During the first lesson we simply introduced these lines so that they were aware of what we meant:  l  __  /   \   )   (
Once students understand how to write the letter, we use zoo phonics to explain how the letters sound. 


Zoo Phonics
Zoo Phonics is a program that uses real letter sounds and kinesthetic learning to teach about letters. This is not the official program the school uses but my mentor teacher has found that students really enjoy it and remember it! Each day we introduce one letter character. They kids love to guess what animal it might be and what sound they might make. The cards explain exactly what sound should be made. Some are long sounds like Allie the alligator who says "aaaaaahhhhhhh".  Some are short sounds like Catina the cat who says 'cu, cu, cu" when she cleans her face. We also explain how to say the sound. Some sounds are soft and use more breath where as others are harder and are spoken from the throat. The kids love learning the right way to say it and they will correct each other when they don't do it right. 

Reviewing 
It is important to review with the class and to practice together so that students can see how the letters are written and see the common mistakes made by others. 
Sky Writers
Sometimes we review by using our 'sky writers' (aka holding your pointer finger in the air and writing). We say "put your sky writers up and make a capital B". We use the phrases 'capital' and 'lower case'. 
White Boards
Students use white boards to write the letters and show the teacher. We usually review by writing the letters on the board and then ask them to write the capital and lower case. When they hold up the board, we ask them to do a self assessment to say if they think they did a great job (thumbs up), an okay job (thumbs in the middle), or a poor job (thumbs down). We usually don't call out individual students but we will address the common mistakes we see on the boards.
Fill In the Letter
This is one of the students' favorites because they get to come to the board and show off their letter skills. We draw the 4 lines for them and will write in all the capital letters or lower case letters we've learned while leaving a place for the missing pair. If the students want an extra challenge, we will just draw the lines and then tell them which letter to write without any guidance. 

Friday, August 3, 2012

Calender Corner

What's Over There?

In our calender corner we have a list of the months; a monthly calender with the days of the week, number days, year, and important date pictures (birthdays, vacation, holidays); ones, tens, and hundreds pockets with straws to count the days of school; and a birthday display with candles. 


How We Do It 

After our morning message, all 40 of us move to the Nemo rug to talk about the calender. 
1st review the months of the year. The teacher talks about what month it is and how the months don't just stop when we get to December, they start all over! We ask one of the calender helpers to come up and point to each month while the class says them. We clap on the month we're in just to make sure we all know where we are! We use this song to remember all the months. While singing it, the kids thinks is super fun to crouch down and roll your hands while singing. Then, when the song says the month of the year it is, everyone jumps up in the air! 

After the month, we talk about the day of the week it is. Just like the months, we talk about how the days start over when you get to Sunday. We then talk about when day of the week it is. During this, we say each day and then clap on whatever day it is. We do this quite a few times because some students get confused since this part changes everyday. After we talk about the day for a bit, we play a song about the days of the week! The students think it is hilarious to pretend like they are rapping and we all sway seven fingers in the are while singing/rapping about the week. 

Now that we know the month and the day of the week, we need to talk about what day of the month it is. We usually start out by letting students guess what day it is to see if they understand that days of the month are ordinal. If yesterday was the 10th, tomorrow won't be the 30th. The cards we use in the month chart are a pattern of apple, star, apple, star, etc. We let the students guess what the picture will be before we turn it over. Some pick up on the patter pretty early but it takes a while for others. Once you can see the patter forming, we point it out to all our students and use fun motions to remember. For this apple-star patter we had students pretend to bite an apple while say the number of the day that had an apple for the picture. Students make star motions with their hands for each day that had a star picture. This helps because they get into the rhythm of making the motion while counting so we just say 'freeze!' when we get to the number of the month and have them look at what motion they are doing. This is also when we talk about important events and birthdays.

To end our calender corner, we have the students say the WHOLE date. Before we start, we ask "who thinks that they can say if all by themselves?" If think think they can, they put their hands up in the air. If they think they need a little help, they put their arms straight out. If they want a lot of help, they keep their hands in their lap. Then, we all say it together like "Friday, August 10th, the year 2012"

Thursday, August 2, 2012

Hook Ups


What We Do Every Morning

Every morning we hook up our bodies to show students that they are in control of themselves. These exercises are from the Brain Gym program. Below are the ones we do every morning and then we always add something else fun at the end! 

Arms & Legs: Criss cross legs and twisted arms. It is tricky for some students to do the arm part so here it  is step by step. 
1: put your arms out straight in front of you like you are going to clap
2: flip them inward like you are clapping with the back of your hands
3: make an X with your arms flipped upside down
4: lace your fingers together and hold on tight!
5. now here is the magic part- pull your laced fingers towards you and put your elbows at your sides- ta da!

We always wait for everyone to get this part and help those who have a little trouble. When they pretty much have this down on their own, you can teach them how to cross their legs while standing and then sit down into criss cross seat and stand back up the same way. 

Brain: Taking deep breaths help send oxygen to the brain. Instruct students to take a deep breath through their nose and breath out through their mouth. Repeat this breathing. Then take a deeper breath and hold it for a few seconds and let it out the mouth. 

Ears: Take your fingers and unroll your ears starting at the top and going down to wake up our ears. This is supposed to help students wake up their ears so that they can listen to the teacher. 

Eyes: Take 2 fingers and rub small circles right under your eyes. This helps to observe what is going on in the class and to see the board. 

Jaw: Take the same 2 fingers from the eye hook up and rub small circles on your jaw hinge. Help students understand where their jaw is- mixing up the jaw and the cheeks is a pretty common mistake! Instruct students to open their mouths and take a deep breath which will make them yawn. 

The Extra One

Brain Button: The place between your nose and lip is a brain button. Instruct students press their brain button with two fingers. See if they can hear their brains waking up. 

Caterpillar: Students put their legs out if front of them and scoop into them middle then out again. This is can be really fun to do with different categories! For example: 'All the boys caterpillar into the middle! Now caterpillar out!" or "If you are wearing purple, caterpillar in! Now out!" 

Get Out Your Ball & ___: Tell students to take out their ball from their pocket! Of course, these are just pretend, but you can ask students about their ball like what color it is or how big it is. If students seem hesitant, let them borrow one of your balls! Take the ball and bounce it on each toe if sitting or each opposite knee if standing. There are tons of things you can do with this! 
- counting 1-10
- counting backwards 1-10
- saying the alphabet
- saying a poem/ nursery rhyme
- counting by 2/ 5/ 10s

Wednesday, August 1, 2012

Daily Schedule


Pod 2's Daily Schedule
Keep up with what the Nemos are doing today!

 7:50-8:30 Number Corner/ Morning Message
8:30-9:00 Alphabet in Action/ Wilson Reading 
9:00- 9:30 Bridges Math/ Number Corner
9:30-9:55 Reading Adventure
10:00-11:00 Specials
11:05-11:25 Words at Work
11:25- 11:30 Singing/ Restroom Break
11:30- 12:15 Lunch
12:15- 12:30 Silent Reading/Small Intervention 
12:30-1:00 Writer's Workshop [computer lab]
1:00- 1:30 Outside Recess Break
1:30- 2:30 Bodies in Motion Inquiries [computer lab]
2:35-2:50 Prepare for Home

Around the Room


 I am very excited to be working with a mentor teacher who is extremely organized and creative! I feel like our classroom has so much to explore but not too much to where it is overwhelming. This highlights post a few of the key elements in our classroom that I feel are important. 

Sign In Station: To the far right you can see our sign in station. Every morning, our students sign in by writing their first name. There is a clip board and a laminated list of their name printed to the left. On the right, there is a sheet of paper with boxes for each student. The paper is replaced everyday and we keep track of how students' names improve throughout the year. We also change the task from just first name to first and last, and eventually first and last with proper capitalization.

Tool Box: There is a wall of cubbies where students keep their tool boxes in the back of the classroom. The  cubbies have their first and last name labeled on the bottom with their poem folder and a white board. In the tool boxes are markers, glue stick and bottle, 2 pencil, behavior sheet (where 5 star stickers go), a box of basic crayon colors, a sock, and a dry erase marker. Students can carry these tool boxes to their centers or just go get tools out of them for certain activities. 

Word Wall: This is pretty much your basic word wall. It has all the letters on a board and we add our site words to it each week. The idea I really want to remember about this wall is how my mentor adds the students' names to the wall! We print their names and cut them out with high and low letter tracking. We then put their names on construction paper and put their picture beside it. This helps because they can really connect their names to the letter it starts with. It also makes them feel cool to be part of the word wall! 
Date and Daily Agenda: This element of the room is a key part in our morning routine. The white board in the middle has the day of the week, date, and short hand day (08-10-12) written on it. This is the first time we talk about the date each day. The pictures around the board show what our daily schedule looks like. It has each part of the day including lesson times, lunch, specials, recess, silent reading, and 'see you later'. We talk about this each day so that students can get ready for what is ahead. 
Star Super and T3 Wall: Each week we select one student who's work will be displayed all week! Also, our school's mascot is the tornado so when we do really great work, we call it being a T3 because T3s are highly powerful tornadoes. There is a lot of emphasis on being a T3 in the older grades so we like to introduce concept early on. We change out the T3 work pretty frequently and always talk about what was so great about it so that everyone can see what good work (a.k.a. T3 work) looks like.  

Daily Jobs: Each one of our 8 tables have a fun character on it and these coordinated with the characters in our 'lead families' for the job rotations. So for example, on Tuesday, the Dori table will be the 'lead family' and will all have jobs. The jobs are line leader, paper helper, calender helper, sanitation manager, and caboose. There is a new 'lead family' every day. This type of job rotation is what I grew up with but some of the other teachers in Pod 2 just have 1 'teacher's helper' each day. This might be easier to keep up with but the students won't get to help as often. 

Behavior Plan

Making the Behavior Plan

1:  Use the cutting board to cut printed strips of the students names. 
2: Glue the name onto the star (we went with 'puffy' stars this year) and fold down the edges on around the back
3: Add a picture of each student to the star (these pictures were taken on the 1st day of school in Katie's Garden & the students were holding a stuffed animal Nemo- super cute!)
4: Laminate and add velcro to the back so the stars can move on the wall


How the Star Wall Works

Everyday, all students start the day on 3. This reminds the students that each day is a fresh start for them to make good decisions or bad decisions. Teachers can tell students to move their star up or down periodically throughout the day.You can move the stars up or down as many times as you see fit. Sometimes students will be on 5 at lunch but then choose to misbehave all afternoon and end the day on 1. Here are a few times we like to acknowledge students & let them move their stars:
-the 1st 3 students who quietly & quickly move rugs during morning message/calender time
-when setting a good example while the rest of the class is noisy
- a student who had been making bad choices but has decided to turn their behavior around
- when whole class sat through a lesson & made great behavior choices
- a student who raises their hand and speaks only when they are supposed to 
- after lunch if no one's bands were taken
- & any other time when we are proud of our students and want them to know it! 


Lunch Bands: Before lunch, each student get a rubber band to wear on their wrist. They wear it all during lunch but if it gets lost, broken, or if a teacher has to take it away then they must move their star down and walk laps during recess. At recess, they have to talk to the teacher and explain why they were asked to walk laps.